Podcasting has vastly expanded since the mid 2000s, providing a platform for pretty much anyone to talk about pretty much anything. This article will help you find the right gear to start recording your own podcasts.
Prices and availability of products discussed were accurate at time of publication, but are subject to change.
The first thing you’ll need is a good room to record in. If you have access to a professionally treated studio, go use that! If not, try to record in a room with the following characteristics:
⦁ Carpeting. Hardwood floors look beautiful, but hard surfaces bounce sound around, creating echoes that can negatively impact your recording quality. If you’re recording alone, consider setting up a microphone in a closet full of hanging clothes. My wife and I create professional voiceover recordings this way in our small NYC-area apartment.
⦁ Small size. Smaller rooms (especially carpeted ones) will have less natural reverb.
⦁ Minimal ambient sound. Street noise and HVAC systems can add background noise that can mess up your recording. If you’re in an apartment, be aware of folks making noise above you or out in the hall.
⦁ Irregular shape. This one is a bit of a tall order, given that most rooms are square. But recording in a room with a non-square shape can also cut down on sound bouncing around. Parallel walls can bounce sound like a ping pong ball.
The next thing you’ll need is a a computer, a mic / sound interface, and recording software.
Most computers with a modern i3/i5 processor or better and with at least 8 GB of RAM will handle one or two channels of audio just fine. The quieter the computer, the better! Fan sounds can get caught up in your recording, so if possible keep your computer far away from your recording space. If you have a laptop with a webcam, you can use that, but you (and your audiences) will tire of the (lack of) sound quality rather quickly.
Microphone and mixers
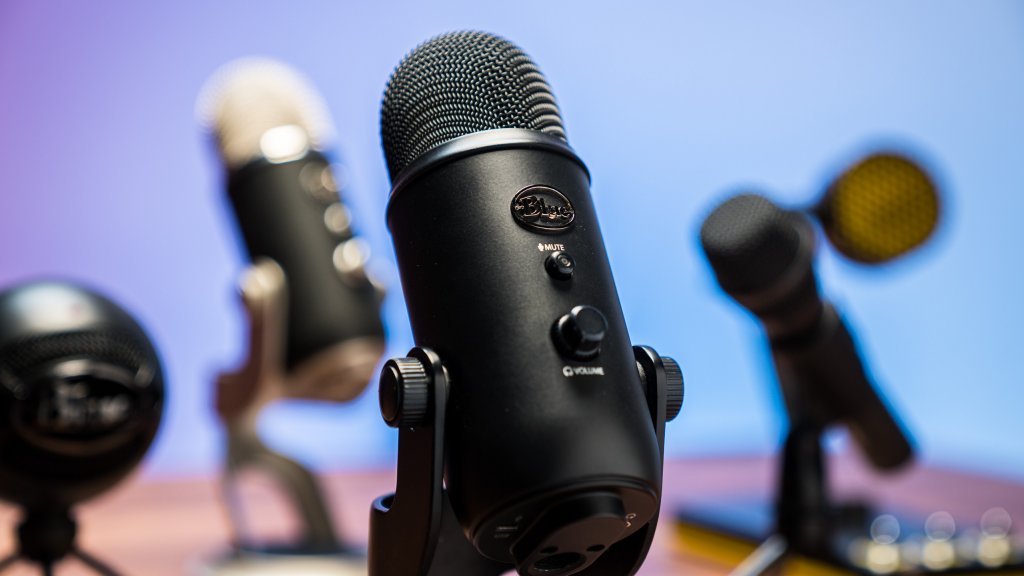
A good solution for a solo podcaster is the Blue Yeti USB Mic. You can record a single podcaster very well with this unit, and it doesn’t require a separate audio interface. Also, it sits right on your desktop with its integrated stand. A few years ago USB mics were not great, and I wouldn’t have recommended them, but Blue raised the bar with this unit.
If you need to record a group of people, you can place the Yeti in the middle of a table, set it to omnidirectional mode, and get pretty decent results. (Check out the Soundcloud link in this article about D&D podcasting for an example.) Remember, the closer the speaker is to the microphone, the richer, bassier, and cleaner the sound will be. When you record multiple people with a single microphone, you are sacrificing clarity for flexibility.
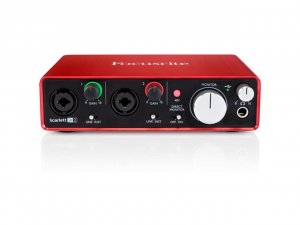
If you’re recording multiple people, you’ll ideally want to record each person on a separate track, with a separate mic. This will allow you to tweak their levels during the editing process. If you want to go in this direction, consider the Focusrite Scarlett 2i2. This interface has two microphone inputs with individual gain controls, allowing you to control the levels depending on the volume of the person speaking. It’s also bus-powered, so you don’t have to fiddle with a separate power adapter.
Why get a separate sound interface? For one thing, it allows you to connect microphones to your computer via professional connections like XLR and TRS. You can try to connect a professional microphone to your computer’s ⅛” microphone jack with a variety of adapters, but it’s not going to sound good.
Professional microphones require pre-amps, which audio interfaces also provide. They also provide low latency monitoring, if you like to hear yourself as you’re speaking. The Scarlett 2i2 only provides a single headphone output, but you can remedy this with a headphone mixer, which you can connect to the Scarlett’s headphone output.
For non-USB microphones, I would also consider the Shure SM58, which is an extremely durable, industry standard live performance mic that works great for recording as well. You can go cheaper than this, but if you want something that will last you years and maintain a decent resale value, it’s hard to go wrong with an SM58. A desktop microphone stand also usually includes a pop filter, which prevents plosives (the burst of air from pronouncing “b’s” and “p’s”) from hitting the mic and ruining your recording.
Software and accesories
The open source Audacity is a really cool piece of free audio recording software, and it works on Mac and PC. Mac users also receive Garageband free with any Apple laptop / desktop. If you want to sound cool and knowledgeable, recording software is often referred to as a “digital audio workstation” or DAW.
I recommend that beginners start with Audacity or Garageband because there are a ton of resources online that will help you get the most out of these two programs. Logic, Ableton, Pro Tools, and similar programs are great, but they’re complicated, professional pieces of software, and their expansive feature sets are largely overkill for podcasting. If you do decide to step it up in terms of DAW software, I’d consider Adobe Audition CC because their audio repair features are terrific, especially for removing mouth sounds, errant breaths, and background noise.
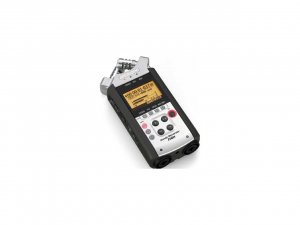
If you’re interviewing people in the field or making live recordings of bands, the Zoom H4n is a solid standby. It has integrated stereo microphones, as well as two microphone inputs. I’ve used one before to record the auxiliary output from mixers, letting me get crisp recordings of multiple speakers / performers at events. However, keep in mind that you’ll only get a single stereo feed this way, which reduces your ability to edit in post.